How to Remove an Old Ceiling Fan & Install a New One in Northern Colorado (Step-by-Step Wiring Guide)
Replacing a ceiling fan is a practical home improvement project that can improve airflow, lighting, and energy efficiency. Whether you're upgrading an outdated fan or installing a new one, understanding proper ceiling fan wiring and safety procedures is essential. In this guide, we’ll walk you through how to remove an old ceiling fan and wire a new one step by step—safely and correctly.
Tools & Materials Needed to Replace a Ceiling Fan
Before you begin, gather the following tools:
- Screwdrivers (Phillips & flathead)
- Voltage tester
- Wire strippers
- Electrical tape
- Wire connectors (wire nuts)
- Ladder
- Drill (optional)
You may choose to use an electrician saving time and damage to ceiling.
Safety Precautions Before Removing a Ceiling Fan
Safety comes first when working with electricity:
- Turn off power at the breaker
- Use a voltage tester to confirm wires are not live
- Use a stable ladder
- Avoid working alone
You may choose to use an electrician saving time and damage to ceiling.
Supplies Needed
• New fan
• Screwdrivers (flat and Phillips)
• Voltage tester
• Ladder
• Wire cutters
• Wire caps
• A buddy fan-rated ceiling box or fan-rated mounting brace
- Electrical tape
- Wire strippers
- Safety glasses and gloves
- Optional: blade-balancing kit
Step-by-Step: How to Remove an Old Ceiling Fan
Step 1: Turn Off Power
Shut off power at the breaker box and verify using a voltage tester.
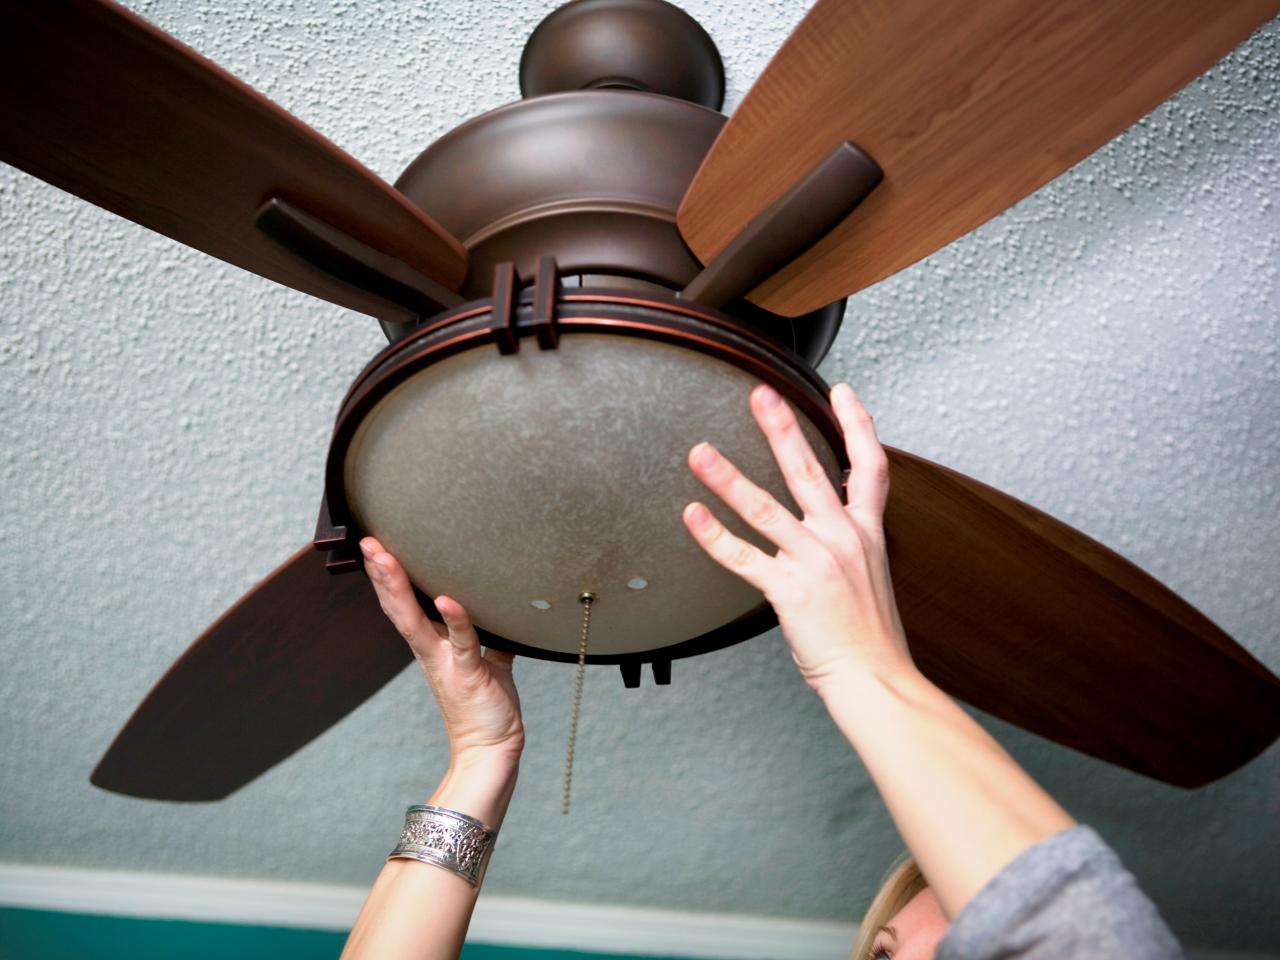
Step 2: Remove Fan Blades
Unscrew and remove each blade to reduce weight.
Step 3: Remove Light Kit (if applicable)
Detach the light fixture and disconnect wires.
Step 4: Disconnect Wiring
Carefully remove wire nuts and separate wires.
Step 5: Remove Mounting Bracket
Unscrew and remove the bracket from the ceiling box.
Additional Wiring Notes
- Wire colors may vary; always follow the fan manufacturer’s wiring diagram.
- Older homes may have non-standard wire colors—take a photo before disconnecting anything.
- Ensure all wire nuts are tight and wires are secure.
- Keep motor wires and light-kit wires clearly separated.
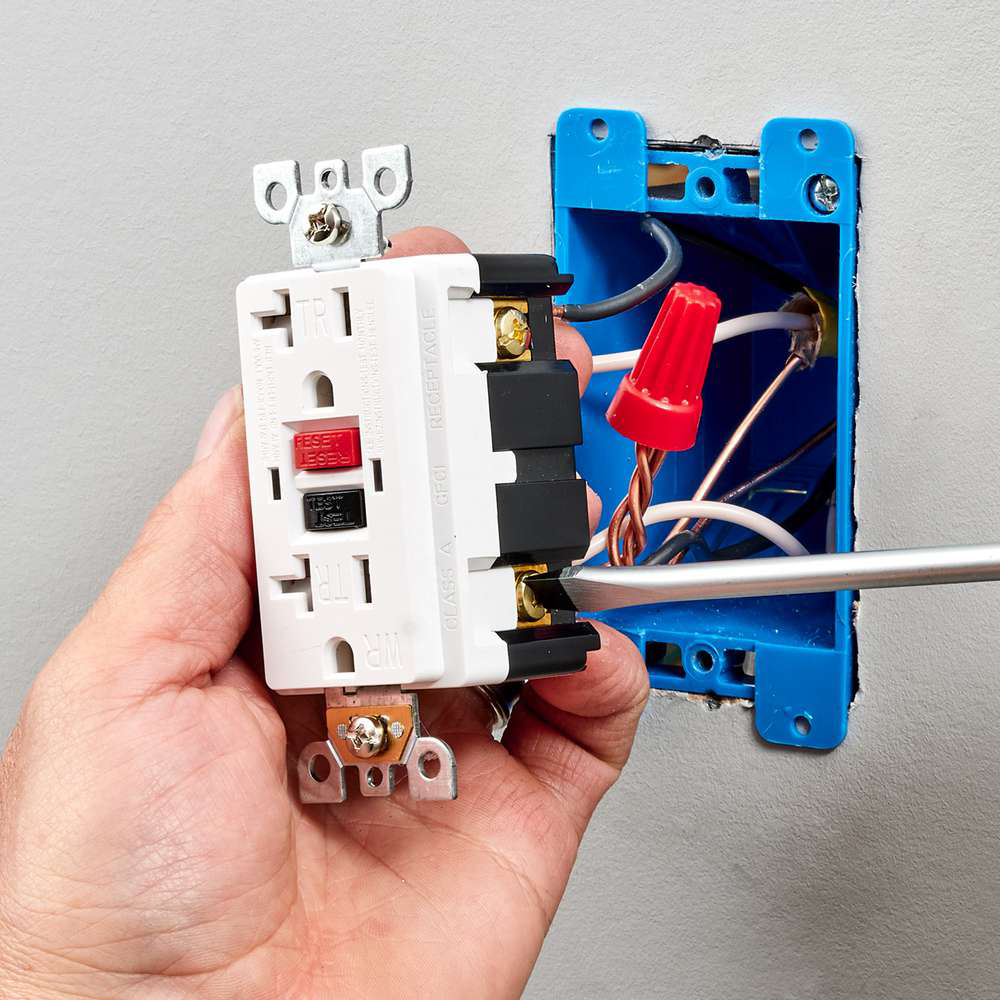
Do You Need a Ceiling Fan-Rated Electrical Box?
A ceiling fan must be mounted to a fan-rated electrical box designed to support weight and vibration. Standard light boxes are not safe for fans and can lead to serious hazards.
How to Install a New Ceiling Fan (Step-by-Step)
Step 1: Install Mounting Bracket
Secure the bracket to the electrical box.
Step 2: Hang the Fan Motor
Attach the fan to the bracket hook temporarily.
Step 3: Connect the Wires
- Black → Fan motor (hot)
- Blue → Light kit
- White → Neutral
- Green/Copper → Ground
Secure connections with wire nuts.
Step 4: Attach Fan Blades & Light
Install blades and light fixture per manufacturer instructions.
Step 5: Restore Power & Test
Turn power back on and test fan and light functions.
Safety First (Before You Begin)
- Turn off the breaker and verify power is off with a voltage tester.
- Use a sturdy ladder and wear eye protection and gloves.
- Ceiling fans must be mounted to a fan-rated electrical box or fan-rated ceiling brace.
- If the existing ceiling box wiggles or is not fan-rated, replace it before proceeding.
Common Ceiling Fan Wiring Configurations
Single Switch Setup
Controls both fan and light together.
Dual Switch Setup
Allows separate control of fan and light.
Remote Control Setup
Uses a receiver unit inside the fan housing.
Understanding Ceiling Fan Wiring Colors
Ceiling fan wiring can vary slightly, but typically:
- Black wire = fan motor power
- Blue wire = light power
- White wire = neutral
- Green or copper = ground
- Red wire = second switch (optional)
Troubleshooting After Installation
Fan Not Turning On
- Check breaker
- Verify wiring connections
Light Not Working
- Ensure blue wire is connected
- Check bulbs
Fan Wobbling
- Tighten screws
- Balance blades
Cost to Replace a Ceiling Fan
- DIY: $50–$200 (fan cost only)
- Professional installation: $100–$300
Hiring a professional ensures safe and code-compliant installation.
Wiring a ceiling fan with four wires is the most common; however, an additional color wire may be included. Here is what each wire color represents:
Household:
- The black wire is the hot wire that leads to the switch.
- The white wire is neutral and completes the electrical circuit.
- Copper or green wire is the ground wire and keeps your fan from experiencing power surges.
- If you have a blue and black wire coming from your household circuit, you should have two switches on your wall.
- If you had a red wire coming from your ceiling, it is hooked up to your wall switch.
Fan:
- Black wire is for the fan.
- Blue wire is for the light, if light is included with the fan.
- White wire is neutral.
- Green wire is for the ground.
- Red wire is sometimes included and acts as a conductor to carry power to the light kit.
Before you begin, make sure all electrical circuit breakers related to the wiring are turned off. If needed, consult a professional electrician to ensure that your breaker box and electrical switches are to code. Also, make sure to strip the ends of your wires to expose the copper end.
Tip: Some manufacturers may use different color coding, so be sure that you follow the instructions included with your fan.
Wiring a Fan or Light Without Switches
Typically used when there is no switch located in the room where the fan/light will be located. This option allows you to pull power for the fan and/or the light from one connection to a nearby power source.
This method means you would rely on the pull chains included with your fan to turn on the light and the fan. For rooms without switches, ceiling fan remotes can alleviate the need to use a pull chain.
- Connect the white wires (neutral wires) from your fan and ceiling together.
- Connect the green wire to your household ground wire (copper/bare wire).
- Connect the black wires.
- Lastly, connect the blue wires, or the blue wire to the black wire for lights. For ceiling fans without lights, follow the same step. This will allow you to add a light kit later on without having to rewire the fan.
- Tuck the wires back into the box.
- Turn the power back on and test the fan.
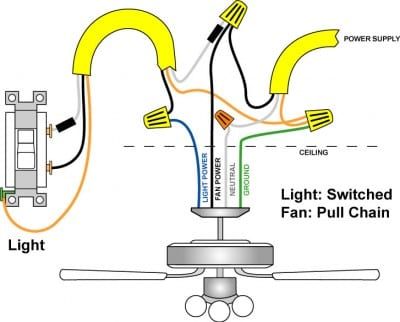
Single Switch Using Switch for Light and Pull Chain for Fan
One of the most used methods, this only requires one light switch.
In this scenario, we recommend wrapping the white wire with electrical tape to indicate it is a hot wire rather than a neutral wire. In order for the light to be controlled by its own switch, the wiring between the switch and the fan unit needs a fourth wire, a red wire, to carry power to the light kit.
- Connect the green wire to your household ground wire (copper/bare wire).
- Connect your white wires and secure with a wire nut.
- Connect the red wire in the ceiling to the black wire in the light kit, and the black wire in the ceiling to the black wire in the fan.
- Tuck the wires back into the box.
- Turn the power back on and test the fan.
Wiring Ceiling Fan and Light With One Switch
This method allows you to turn on the fan and the light with a single wall switch, eliminating the need to use the pull chain every time you want to adjust the fan.
- Connect the green/copper wires.
- Connect the white wires.
- Connect black wires.
- Connect the lighting wire, typically blue, to the black fan wire and the black ceiling wire.
- Tuck the wires back into the box.
- Turn the power back on and test the fan.
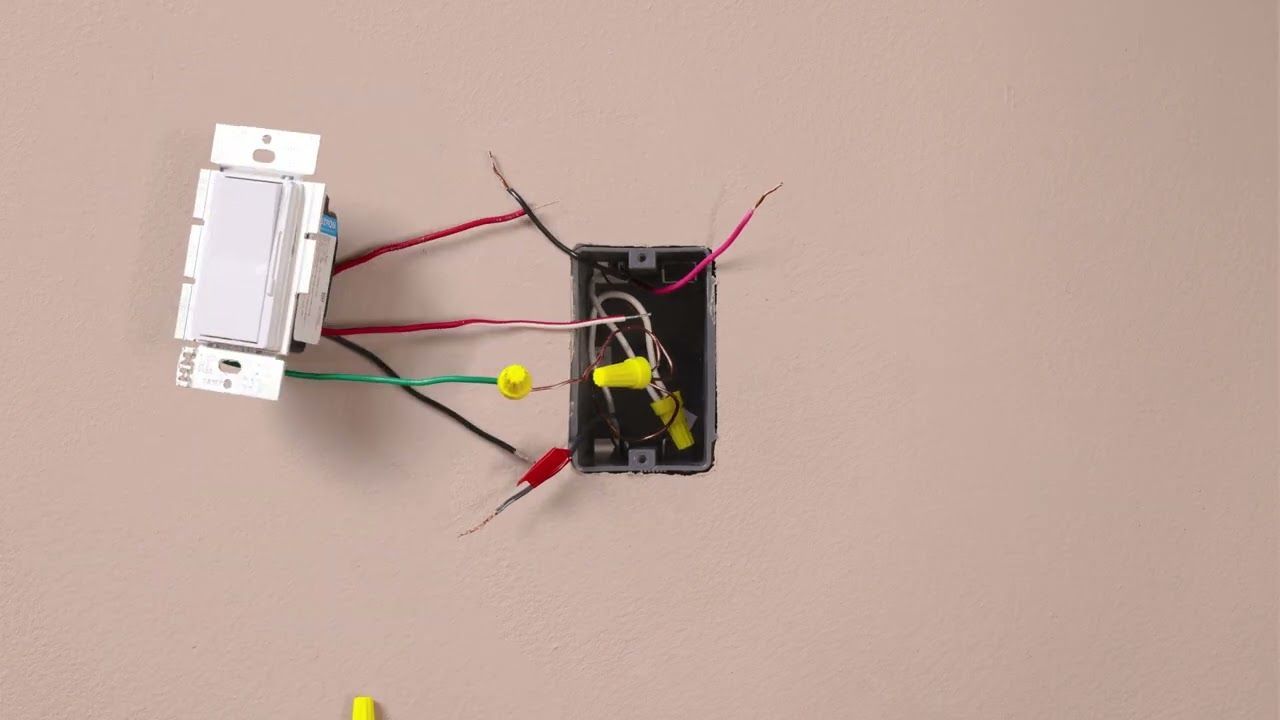
Wiring Ceiling Fan and Light with Separate Switches
This method allows you to operate the fan and light power separately. Your power supply line (the black wire) should be feeding both switches, and those switches power the fan (black) or the light (blue).
To use this method, the wire from your wall circuit to your light must have 3 wires.
- Connect the black fan wire to the black ceiling wire.
- Connect the blue wire to the red wire.
- Connect the white wires.
- Connect green/copper wires.
In the switch box:
- Split the incoming hot wire into a "Y" and connect it to a terminal on each switch.
- Connect the black wire to the screw located in switch #1.
- Connect the red wire to the screw in switch #2.
- Connect the white wires.
- Connect green/copper wires.
- Tuck all wires back in their boxes.
- Turn the power on and test.
Wiring a Ceiling Fan with a Remote
Most newer fans come with ceiling fan remotes for ease and convenience. The receiver is placed inside the fan, and the control sits on the wall of your room. For a handheld remote:
- Turn off the electricity.
- Remote receivers will have DIP switches, or a series of buttons, and three or four wires.
- Insert the battery.
- Once you have the fan mounted and in place, slide the ceiling fan remote receiver into the space above the downrod.
- Connect corresponding wires from the fan to the remote (white to white, black to black, blue to black, and green/copper to green/copper).
- Turn the power back on and test.
Troubleshooting & Post-Installation Checks
- Fan wobbles: Tighten blade screws and mounting bracket; check blade balance.
- Fan hums or is noisy: Ensure the canopy isn’t touching the motor and all screws are tight.
- Light doesn’t work: Check the separate light-kit wire (often blue or striped).
- Fan won’t turn on: Recheck breaker, wiring connections, and remote receiver placement.
- Ceiling box moves: Stop and replace with a fan-rated box.
Understanding Ceiling Fan Wiring Colors
Ceiling fan wiring can vary slightly, but typically:
- Black wire = fan motor power
- Blue wire = light power
- White wire = neutral
- Green or copper = ground
- Red wire = second switch (optional)
When to Call a Licensed Electrician
Call a professional if:
- There is no existing wiring
- You have multiple switches and confusion
- Wiring appears damaged or outdated
⚡ Don’t Leave Your Safety to Chance
Electrical issues aren't just a nuisance—they can be a fire hazard. If you’re smelling smoke, seeing sparks, or dealing with constant breaker trips in Severance or Greeley, you need a professional eye immediately.
ACDC-Electric has been Northern Colorado’s trusted choice for over 40 years. We provide fast, code-compliant repairs to keep your home and family safe.
📞 Call us now at 970-330-1656 for expert troubleshooting and 24/7 emergency support.
Can I replace a ceiling fan myself?
Yes, if a fan-rated electrical box and proper wiring are already in place. However, if you need to install a new circuit or are uncomfortable with high-voltage wiring, it is safer to hire a licensed professional like ACDC-Electric.
Do I need a special electrical box for a ceiling fan?
Yes. You must use a UL-listed, fan-rated electrical box labeled "Acceptable for Fan Support". Standard plastic lighting boxes cannot handle the weight and constant vibration of a spinning fan motor, which could lead to the fixture falling.
How long does it take to install a ceiling fan?
A standard replacement typically takes 1 to 2 hours for a professional or experienced DIYer. Complex installations involving new wiring or vaulted ceilings may take significantly longer
What wires go where on a ceiling fan?
In standard U.S. residential wiring, black connects to the fan motor (power), blue connects to the light kit, white is the neutral return, and green (or bare copper) is the ground for safety.
Can I replace a ceiling fan myself?
Yes, if a fan-rated electrical box and proper wiring are already in place. However, if you need to install a new circuit or are uncomfortable with high-voltage wiring, it is safer to hire a licensed professional like ACDC-Electric.
Do I need a special electrical box for a ceiling fan?
Yes. You must use a UL-listed, fan-rated electrical box labeled "Acceptable for Fan Support". Standard plastic lighting boxes cannot handle the weight and constant vibration of a spinning fan motor, which could lead to the fixture falling.
How long does it take to install a ceiling fan?
A standard replacement typically takes 1 to 2 hours for a professional or experienced DIYer. Complex installations involving new wiring or vaulted ceilings may take significantly longer.
You might also like